Monday, December 30, 2019

Holey Heater Box

I've never owned a proper DA before.  I borrowed one once when I was doing bodywork on the '71 station wagon, but it broke and I had to repair it and found out I could have bought one for almost the cost of what I had to pay to fix the old one I borrowed.  Compared two the 3 years and 2 broken arms it would have taken me to sand down the mound of resin I had built up the DA knocked it out handily, after I picked up another fiberglass repair kit and patched the final hole.  I started with 80 grit and worked my way up.

My initial plan was to put body filler over the repair and repaint the entire heater box satin black.  As I stated before, I don't like the look of this but it seemed to be the only option given how many repairs I had in the box, but after looking at it for a while I realized that all the repairs will be almost entirely hidden.  The vacuum canister bolts directly over the highest repair.  The only one that might show would be the larger one to the furthest right and I'm pretty sure that it will be mostly hidden, if not entirely, by the passenger side head.  This would allow me to keep the original texture and color of the heater box on the remainder of parts of the heater box that will be visible.  I sanded further and tested an area of clear coat and thought the results were preferable to a solid painted box so I sanded the entire box and applied a few layers of clear coat.

I let the cardboard stay too long on the backside of the holes and it ended up sticking to the back of the box.  I had to sand this off so it wouldn't catch on fire inside the heater box.

The top of the heater box I got from the parts car had one cracked area where someone had over-tightened the bolt.  When held it up to a light I could see daylight through the cracks so I filled it with JB Weld, pushing the product deep into the cracks until it came through on the other side.

Then I sanded the surface smooth because this area will be sealed with the gasket against the firewall.

I left the topside un-sanded to leave more material in place.  This area is hidden under a mesh screen which is also hidden under the hood, so I prefer the safety of sealing the leak to a perfectly sanded finished product.

I used Napa butyl tape Part# 4195 for the heater box to firewall and between the top and bottom half of the heater box, though I will use much less between those two halves than I did last time, and I use the 3M "Windo-Weld" Part# 08609 to seal the top of the heater box to the cowl and a few seams where the the parts of the lower heater box bolt together.  This is the same Windo-Weld I used last time but my old tube had dried up.  I'm hoping I can keep it sealed this time because this tube is expensive.  I really like the Windo-Weld because it seal great, goes on nicely, looks nice when smoothed just like caulk and is very easy to remove without damaging anything if need be.

I sealed all the areas where the pieces of the lower heater box bolt together with Windo-Weld.  These areas will receive a second coating when it is finally sealed against the firewall.


My original plan was to replace the rubber heater box gasket with butyl tape, but the gasket was so thick and came off in such good shape I decided to reuse it along with the butyl tape.  I ran a bead of butyl tape around the sealing surfaces of the heater box and installed the gasket, pushing it tight into place to fully seat the butyl tape.  When it's time to install the heater box I will run another bead between the gasket and the firewall.

I removed all of the old unnecessary wires from the passenger side harness, most of which included the wires for the old compressor and the original passenger side port for the antiquated diagnostic system.

I'll re-route and re-loop the wires once I get them run back through the heater box.  Judging by the way it came out, I'm not looking forward to getting that firewall gasket back in place.  Once everything is routed the way I want I'll put black tape over it.

Thursday, December 26, 2019

12 Years of Christmas

Progress has been very slow.  Getting arrangements made to get The Caprice into the upholstery shop was a long process.  Every shop was backed up for months, but they were able to work me in.  I picked out the color to match as closely as I could to the original color, but after it was on I have to say I wish I had gone back with a darker camel.  My initial concern was that a darker color might blend in too much with the body and not give enough contrast.  I don't particularly love the light yellow color, but, it certainly is better than the old top with tears all in it.  They also polished and painted my window trim moldings and sand blasted and repainted the metal trim between the top and the quarter panels.  The best part is, the roof is repaired and no water leaks through it anymore.  I think I mentioned before that I also had the rear window re-tinted while it was out because the 20 year old tint had started to turn purple with age.  After the upholstery shop I had to get the car back to the body shop because they had forgotten to replace the drivers side door pins. 

I went scrounging at the scrapyard and found a couple panels to turn into floorboards.  I believe they are from a washing machine.  Several years ago while I was there I had noticed a piece in the back with casters on it that would be perfect to make an engine stand.  I need something to mount the old engine from The Caprice onto so I can finally get it out of my driveway and I thought if I could find something similar to what I had seen before I would pick it up.  To my surprise that piece was still laying there in the very back of the yard so I snagged it also.

I was sorely let down when I checked the floorboards after a big rain and found water again.  This time, however, it was much less and I was easily able to tell where it was coming from.  It was from the lower heater box.  I had sealed the top of the heater box earlier, but apparently the lower portion was having issues also.  This was a big let down because I was ready to move on to putting the carpet in and being finished and I knew how much work was going to be involved in removing and repairing the heater box.  This would have been so much easier when I had the fender, hood and engine removed.  The heater box issue is very well known to people who own these cars.  It's not an if it has a leak, but rather has the leak been fixed yet.

I had a more than the usual amount of setbacks during this process, but the weather suddenly warmed up into the 60s, so regardless of how many things went wrong I'll take that over working in 15 degree weather.  When I was removing the lower fender brace I began to feel a strange tension on the ratchet.  When I looked I noticed the lower brace had twisted over 360 degrees.  I was able to untwist it some by reversing the ratchet and I will still need to repair it further before installation.

The inner fender needed to be removed to gain access to the heater box.  Since I will already have the fenderwell out I'm going to take it and the battery tray to be sandblasted and powder coated since the rust in that area is significant enough that it will likely cause issues within several more years.

I don't think it is supposed to come out with the fender on, but I didn't want to remove the fender because I would also have to remove the hood and that is not a one man job.  The inner fender came out after a lot of persuasion.


Here is a better view of the afflicted area.  Often the drain here can clog and cause issues, but I had already cleaned mine out and knew it wasn't the problem.  Also, the grommet at the bottom of the wiring harness was difficult to remove.

I used windshield sealant when I installed the top of the heater box last time and I did a very, very thorough job.  As a result the lid was absolutely stuck.  I went around the entire box using a scraper to remove the seal, trying as much as possible not to pry on the old fiberglass.

Despite my best efforts the box broke in two pieces along a previous stress crack.  I was fortunate that it came out in only two pieces.  The copious amounts of sealant can be seen below.

There were a few wires that were still in place but not being used anymore in the engine bay.  I didn't remove them previously because getting access to the firewall grommet was too difficult but because I now have everything off there's no reason not to clean up the rest of the remaining wires.  A while back I explained how the new downsized Caprices for '77 used a very early diagnostic system that added a great many number of wires to the harness.  There were two ports for this diagnostic system that a very early style computer system would plug into.  I previously removed the one on the driver side and now I'm going to remove the one on the passenger side that mounts on top of the heater box.  There is also some wiring for the old AC compressor and components that I'll be removing.

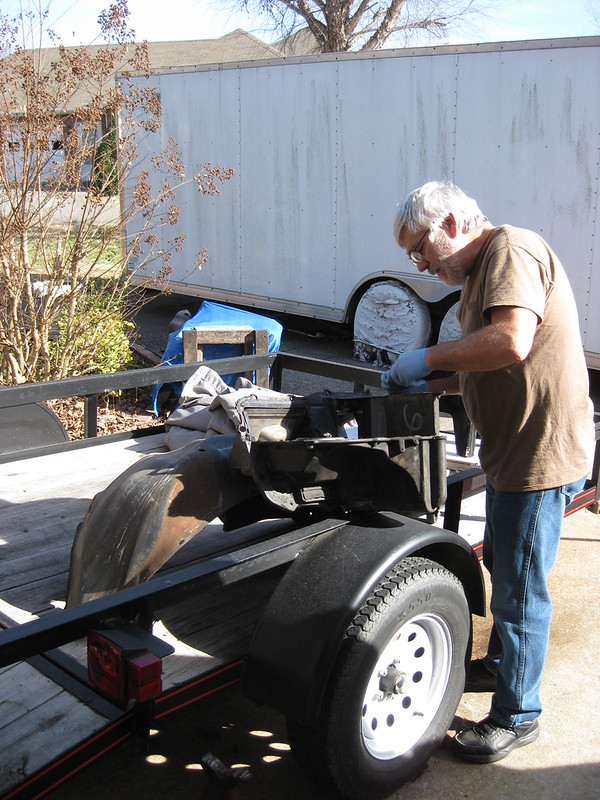
It was Christmas at this point and my mother and father-in-law came down to visit.  My father-in-law accompanied me up to the country where I have a parts car stored so I could make use of the heater box top.  Taking our time and being careful it came off without any trouble.

The lower section of the heater box was problematic to remove from The Caprice.  There were some things keeping the box from releasing from the firewall, but we couldn't tell what they were.  One thing I thought was an issue was this rod that controls the blend door.  I thought I needed to remove this clip but couldn't figure out how to release it without breaking it.  Fortunately I realized that removing it wouldn't do any good because the other end of that rod is connected to the heater box.  I ended up removing the rod from the interior of the car which allowed it to come out with the heater box.  The other issue holding the box in place was a hidden bit of silicone put there by someone in the past and another vacuum line.

After tackling those things I was able to get the box off of the firewall, but then it wouldn't come out of the engine bay.  After a lot of finagling I was able to free the box, aided by removing the coil packs.  Also, I was not able to remove the evaporator core from the box with the lines attached because one was a solid hard line and the other didn't have enough play in the hose, so now I'll also have to recharge the system.

While I was working on the firewall my father-in-law cleaned all of the old sealant off the heather box, top and bottom, and also cleaned both of them with Dawn soap and a toothbrush. That was a time consuming process.

I cleaned the mounting surfaces on the firewall with a combination of wire wheels, wire brushes and sanding discs on the pneumatic grinder.  My air tank isn't very large so I would switch between these while the air tank filled back up.  I probably crawled in and out of the wheel well thirty times.  I had cramps in places I forgot existed.

After grinding down all of the rust I coated the area with rust inhibitor and left it while we went to get lunch.  I cleaned it off when we got back and then cleaned the area with wax and grease remover.  After that I masked the area off with tape and then followed that up with paper and filled the hole with cardboard.

I first laid down a couple coats of self-etching primer and then about three coats of semi-gloss black.

I went ahead and sanded and painted some other areas while I was in there.  There was a significant amount of surface rust below the heater box from years of leaking, but nothing had gone further than just surface rust.  I sanded it down to metal like the rest of the gasket area.

While I was removing the heater core I noticed something down inside the box.  I found this old lighter.  It's pretty small for a lighter.  I put a quarter in front of it for comparison in the picture below.  When I opened it a part of the flint bracket fell off and fell on the ground and we still haven't been able to find it.  I've owned this car for 22 years, and it has been in the family longer than that, so this lighter has been riding around with me all these years and I never knew it.

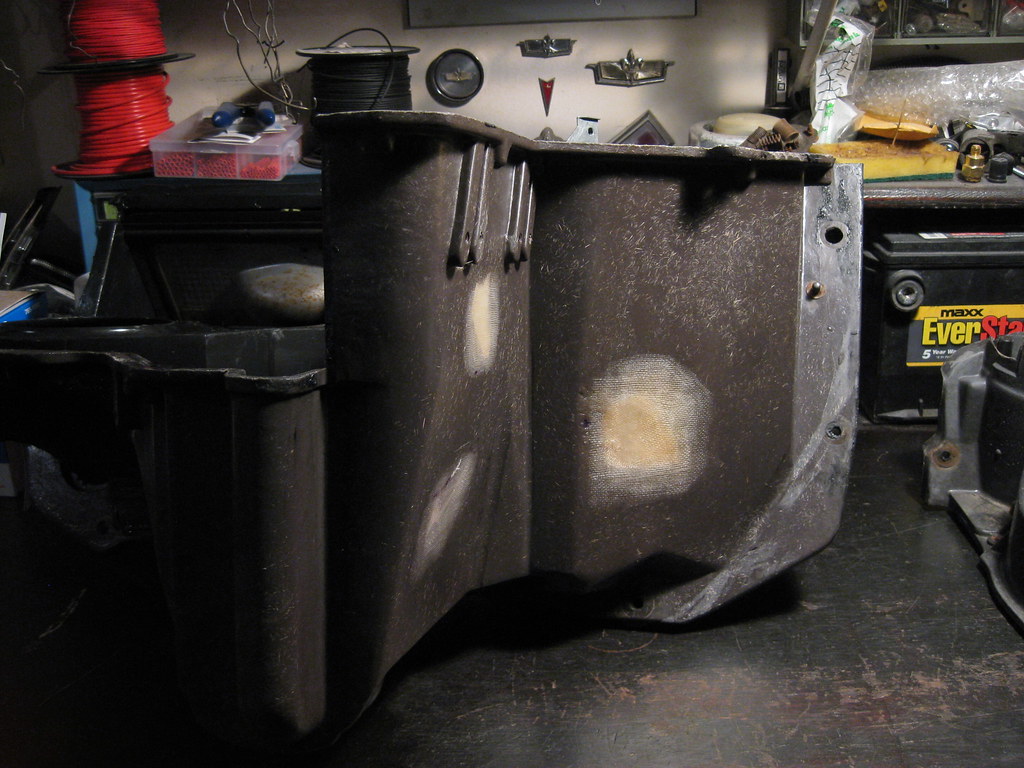
The lower heater box had a couple cracked spots and a hole.  I know at least one of them got done when we were installing this engine.  I'll have to patch them.

The new-to-me heater box lid is in better shape than my old one was, but it is a little more faded because before I bought the parts car it had sat outside with no engine or hood for an unknown amount of time so the UV light had caused some fading.

My first plan was to remove the old heater box to firewall seal completely and replace it with windshield sealant, but after seeing how thick the gasket was I changed plans.  I was able to remove the gasket in one piece without any tears.  I cleaned it with Dawn dish soap, water and a toothbrush.  Because it was still in such good shape I plan to run a small bead of windshield sealer on the front and back of the gasket and reinstall it.


I cut away the necessary broken and cracked pieces and opened up the larger crack, taped off the area and recessed and feathered out the affected areas with the air grinder.

I then proceeded to do what is likely one of the worst fiberglass repair jobs in history.  I have left myself a lot of sanding in the future.  I purchased a fiberglass repair kit from a parts house and it did not provide enough woven cloth to cover all of the areas so I will need to wait to buy another kit.  It was Christmas day so there was no chance of finding anywhere to buy another that day.  I'll repair the next hole and then sand everything down.  I'll need to wait to see how the final result looks before I decide if I'm going to paint the entire box or just the areas seen here.  I prefer the look of the original fiberglass coloring, but given the repairs and the new faded top I may end up painting it all.

Tuesday, November 12, 2019

Scalped


The Caprice has been at the body shop for a while so I have been working on some other projects in the meantime.  

The brake light wasn't working on the Silverwing.  It turned out to be the brake light switch.  Fortunately, the terminals on the switch itself just needed cleaning.  Unfortunately, what should have been a 10 minute job turned into a very long job when the screw holding the brake light switch twisted off.  I ended up having to drill it out and re-tap the whole.  Now I don't have to use the foot brake whenever I want people behind me to know I'm stopping.

I think I've lost a lot of the photos I'd taken and I don't have any idea what happened to them.  We had a litany of brake issues.  I don't have any pictures from working on my dad's '75 Vette.   Dad has owned a '75 Corvette convertible for about 40 years or more and the brakes have never worked properly.  The car wouldn't lock the brakes up.  He recently took it to a shop where they spent several weeks and a lot of money replacing a bunch of parts and didn't fix the problem.  I told him to bring the car by and we'd take a look at it.  I thought the car felt as though the master cylinder was not engaging properly, but these cars are known to trap air in the lines are are difficult to bleed so we started out using the pressure bleeder to flush all the brake fluid in the car, which needed to be done regardless.  Since that didn't solve the problem I did some research and found that from somewhere around 1977 and back Corvettes had adjustable brake rods from the brake pedal arm going into the master cylinder.  We took the master cylinder loose, adjusted the length and that fixed the problem.  

Then while we were at it Dad helped me remove the old vinyl top and all the trim on The Caprice.

After removing the vinyl top the roof seemed to be in better shape than I had anticipated.  I drove to the body shop and we both agreed the top appeared to be in pretty good shape.  I then removed the headliner so the top could be repaired.  Unfortunately after the body shop removed all of the remaining glue and fuzz from the top it was evident that the old metal was in worse shape than we had first thought.

While The Caprice was at the body shop Dad and I tackled the brakes on his '61 Corvette.  It still has the original, single pot master cylinder and drum brakes, which had completely run dry.  We spent two days drying to get the brakes flushed and bled but couldn't seem to get it right.  To make a long story short we found out that a couple of the bleeder valves were partially stopped up.  

Because I apparently love being punished, I decided to drag my old '67 Camaro out and get  it going to drive while The Caprice was in the body shop.  When I went over to Dad's house to get it I decided at the last minute to get his '67 Camaro out and get it going instead.  His car hadn't been driven in about five years and needed some attention.

The points were stuck and the carburetor was leaking for starters.

I drove it to work one day and when I left to go to lunch I quickly found out I had almost no brakes.  They would barely, just barely, slow the car down.  I managed to get the car home and started researching the right master cylinder.  The master cylinder currently on the car was incorrect.  This is a factory disc brake car, so after a little research was able to find the right part.

Of course, nothing is ever easy and some modification was necessary to get the correct part and bracket to fit correctly.  When we went to flush and bleed the brakes we couldn't get the brakes bled, but because of our recent experience with the '61 we quickly knew to remove the bleeder valves and clean them out and that fixed the problem.

While The Caprice was in the body shop I picked up the back window from the body shop and took it to a window tinting business to be re-tinted.  The old tinting, which was over 20 years old, had turned purple.  While repairing the roof, the trunk and hood were repainted and the quarters received new clear coat.   

The route salesman for automotive clips wouldn't return my calls and wasted a week and half of my time, so I had to wait a few days for the clips to come in after I finally ordered them online.  I also was delayed by the window tint business, who continued to tell me the window would be done in a few days and over two weeks later, when I said I was coming to pick the window up regardless of tint, it suddenly was done.

One day a few months ago we had taken The Caprice on a round trip of over 100 miles, most of which was at interstate speeds.  When we stopped to eat and got back in the car a huge plume of smoke bellowed out when I started the engine and then it quit.  From time to time I could smell smoke at startup and from time to time it would still smoke on startup.  After doing a lot of research online I found out that the original design of the PCV valve was faulty and caused the PCV baffles to suck oil up into the intake.  A replacement part is available for a couple different generations.  Finding out which number applies to which engine didn't com easily, but I finally found the information below:

"This is GM's third attempt to mitigate the oil consumption issues plaguing LS1 engines and 1999-2013 LS engine trucks. For some reason the engine eats oil through the PCV setup and people who run catch cans catch a significant amount of oil. For millions of engines that don't it pools up in the intake. I was surprised when I pulled the intake manifold on my truck to see oil weeping out of the intake runner outlets.

New GM valve cover. Includes new gasket and grommets. Part number 12570427 for 2009-prior LS engines which has the hose connector barb for the PCV tubing. 12642655 is for 2010-2013 LS engines which uses a push on fitting connector
."

The difference between the two is seen in holes located in the upper right of each cover.  The old style was a small, round hole that led over to the PCV valve.  The new cover has a redesigned inlet for the baffle that prevents, or in theory is supposed to prevent, the sucking of oil mist from the rockers at higher RPM.

After I got the car back from the body shop I installed the new valve cover, which was a very simple and straight forward procedure.  It was a messy job because the engine bay was absolutely covered in dust from having been at the body shop.  I removed the old valve cover.

I installed the new valve cover and put the coils back on.  I really like the look of the engine without the coil packs on top of them.  Maybe one day in the future I may relocate them, but for now it's much easier and more convenient to leave them where they are.

The top was fully prepared as though it were not going to have a vinyl top for protection.  The bodywork wasn't smoothed like a car that wouldn't have a vinyl top, but the paint prep was the same.

The hood and trunk were also resprayed as mentioned before.

I contacted two upholstery shops and they were all backed up for months.  One upholstery shop's son has started his own business and he has agreed to take me on and work me in.  I took the car down and we picked out material and am currently waiting on the materials to arrive.  Once they do the top and headliner will be installed, at which point I will then fix the floor pans.

I also sprayed down the engine bay using some degreaser.  I think the plan to make the engine look, as much as possible, like it originally came in the car has worked out well, though I still have the desire to fully detail it out.  Maybe one day down the road when some other things on the car are finished.